My Revision Process
I follow a lot of authors on social media. One thing I was struck by when I was first starting out, again and again, was that I had NO CLUE what it meant when they posted about revisions. I mean, I know what it means to revise—to write another draft, to re-work and better your writing—but I didn’t know what that actually looked like.
Since then, through lots of trial and error, I’ve figured a revision process that REALLY works for me. My guess is that everyone’s revision process is different. But I thought it would be helpful to share what I do, specifically.
Step 1: Draft your manuscript to the point where it’s as good as you’re going to get it.
This process should be done on your own. Obviously you can bounce ideas off friends and critique partners, but you should work that story until you don’t know how or what to change to make it better. Now it’s time to pass it on to someone else.
Step 2: Getting an edit letter.
The meat of my revision process begins with the edit letter. For those of you who don’t know, an edit letter is essentially what it sounds like: a multipage letter, whether it be from a critique partner, a freelance editor you hire, your agent, or your editor, that details what needs to change in your story. Everyone writes them differently. Some folks break up their edit letters by story acts, others by categories like dialogue, character, plot, etc.
The first edit letter I got for THE LONELY HEART OF MAYBELLE LANE was from a freelance editor (I worked with Mary Kole, and you can read about my experience here). Working with her was a great experience for me. I understand that not everyone can afford this, but you can find awesome critique partners online, trade full manuscripts, and write edit letters for each other.
For beginning writers, here are some good resources for understanding what an edit letter looks and feels like:
http://naomiedits.com/critique-examples.html (click to download sample edit letter #1 and #2)
And just a note: for every single edit letter I get on a given manuscript—whether it’s from my freelance editor, my agent, or my editor at Knopf—this is the process that I use.
Step 2: Reading and digesting your edit letter.
As soon as I get my edit letter, I print it out. I gather pens and highlighters and I sit down with it. And then I read it. And re-read it. And read it again. I make notes in the margins. I highlight passages. Sometimes, editorial suggestions hit like a strike of lightning—it feels like, yes, this is what needs to happen that will make everything fall into place! Other times, you feel extreme resistance to ideas. You think, this person doesn’t understand what I was trying to do at all. All of that is okay and natural. My suggestion is to let it all sit. Let the advice sink in for as long as you can. For one edit letter, I hardly needed any time at all. The suggestions all felt like lightning bolts, and I dove into revisions the next day. But I recently got an edit letter that didn’t feel good. I wasn’t sure if some of the advice was right for the story, or if I was resistant to the suggestions because it would take a lot of work and thoughtfulness to make it happen. I had to let that edit letter sit for about three months before I was ready to look at it again, to parse out what felt “wrong” because it was actually wrong, and what felt wrong because I was resistant to doing the work. I realize that deadlines make this part hard, but take as much time as you possibly can.
When you’re first faced with all the suggestions an edit letter might have for you to improve your manuscript, it can feel incredibly daunting. It feels amorphous and impossible. What follows next is how I deal with that and make revision suggestions from an edit letter feel bite-sized and achievable.
Step 3: Pull suggestions from your edit letter and turn it into a clear outline.
After I’ve let the notes and suggestions sit and stew, I start the next step: I pull every suggestion that resonates with me from the edit letter into a new document, turning it into general revision “to do” list.
For example, let’s say the edit letter talks about a character relationship. Maybe your reader suggests that their friendship feels flat, dull, or uninspired. That it feels like they became insta-friends, which isn’t believable. Whatever. I take that suggestion and put it on my new revision outline. Sometimes I copy and paste the wording as is, other times I might condense it to say “friendship between character A and character B needs work.” Then I strike through that part of the edit letter to show myself I’ve taken care of it.
So it might look like this:

Sometimes, as I do this, I come up with an idea for a possible fix. So let’s go back to the friendship example. Maybe you realize you need a new scene that helps establish and show why they become friends. Underneath it, I add a “fix.” So now it starts looking like this:

I do this, again and again, until I’ve taken ALL of the suggestions from the edit letter and turned them into an outline. All of a sudden, it goes from overwhelming and scary to completely achievable.
Step 4: Create a chapter-by-chapter revision plan.
Now that I have my revision guide, I open a new document and create a chapter-by-chapter outline. Some suggestions might be chapter specific (expand, delete, move, deepen this moment or beat, etc), whereas others might be things you need to thread through the entire manuscript.
By creating a chapter-by-chapter guide, you make sure you never get lost in the weeds. For the sake of simplicity, let’s say there are three main suggestions from your edit letter (though usually there are about 10x that): issues with your dialogue, the friendship plot between character A and B, and your too-slow plotting. Usually these are things you need to address in every single chapter.
So in this new document you, of course, start with chapter 1. Read your current draft. Then go through your general outline, and figure out the specific things you need to change in chapter 1. For the three issues listed above, it might look like this:

Obviously, this is very simplified. Usually the notes under each chapter are extensive for me. But I work through my general outline until ALL suggestions have been reflected in every chapter they need to address.
Now I have my chapter-by-chapter revision plan. The revisions I need to make may not be easy, but now I have a plan of action with achievable steps.
Step 5: Create a revision schedule for yourself.
This is what keeps me on target, and is especially helpful if you’re on deadline. I usually give myself generous timing—usually more time than I think it’s going to take. I update my revision schedule as I revise every chapter.
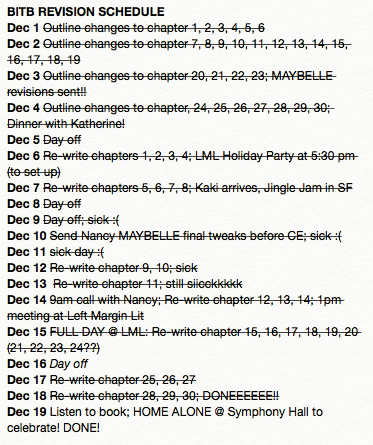
So here’s a sample revision plan I made for myself. For this one, you’ll also notice that I scheduled in time for step 4. Here’s what my original schedule looked like:

And here’s how long it actually took me:
I’ve found it’s much better to be more generous with yourself rather than less—because when you revise quicker than scheduled, it feels so good!
Step 5: Listen to the whole new draft out loud.
After you’ve revised your book (I always start with a fresh document for each draft), listen to the new draft. I can’t read out loud to myself…my tongue would get too dry and fall off. I use an incredible program on my phone called Voice Dream. It will read the entire book to you. The voice is a little robotic, but it works. I cannot tell you how many typos, redundancies, and issues I’ve caught thanks to this process. It creates a much cleaner document.
Step 6: Let it sit for a few days and then…SEND IT OFF!
And drink a glass of champagne. Or a bottle. Revisions are tough, no matter how you approach them. Whatever the case, I wish you luck with revisions of your own and I hope this post was somewhat helpful!